
A properly distressed pair of jeans looks more natural than one that just turned the Philip K. You certainly don’t need any scissor hacking skills to master it. It requires knowledge of textile science, accurate orientation and stabilization strategies.
We are operations specialists and have been in the manufacturing business for more than 20 years under Kaiping Lianwang Garment Co., LTD. We know denim inside out. This guide is all about bridging factory-level knowledge with practical application, starting from scratch. How to safely distress jeans at home, the “stretch denim trap”, and make sure your creations outlast 50 + wash cycles.
I. Denim Anatomy: How to Distress Jeans Like a Pro
Understanding Warp vs. Weft Threads
If you want to know how to properly distress denim your going to need to understand its structural anatomy. The classic denim is a strong cotton twill fabric woven with two different points of yarn /
- The Warp Threads: These are the traditional, vertical, and indigo-dipped threads that provide denim with its iconic blue color.
- Weft: The horizontal white threads that are undyed and serve to fill the inward backing of the fabric.
That aesthetic also keeps us looking at exposed weft threads when you see those pretty, clean white horizontal bands across the raspy fabric of a ripped knee. Therefore, the key to ideal fraying is to impeccably pull out the vertical blue warp threads while preserving the horizontal white weft threads fully. Blindly cutting through both will create a hole the size of a black hole instead of the textured, worn-in fray advised above.
The Essential Toolkit
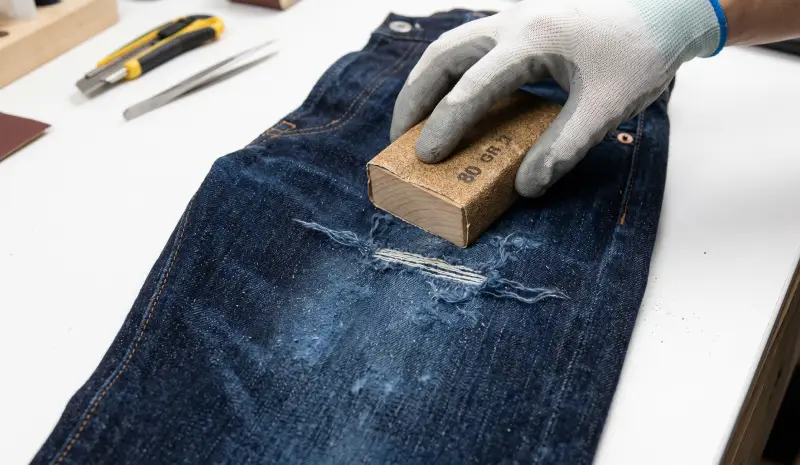
- 80-Grit & 120-Grip Sandpaper: 80-grit produces deep surface wear and scuffing; 120-grit has a natural texture, ideal for subtle fading of the edges.
- Retractable Utility Knife: Use a new, super-sharp blade for cutting warp threads precisely without snagging the fabric.
- Insert Internal Protective Board: After that, you need to insert some kind of thick wooden board or dense cardboard inside the pants leg & it will be in contact with the back of your jeans.
- Tweezers: You need fine-tipped tweezers to isolate and pull out individual indigo warp threads with finesse as you fray your fabric one step at a time.
Beginner Safety Protocol
Step 1: Insert your cardboard backing into the pant leg. With plenty of light to see, draw two horizontal lines directly on parallel plants using your utility knife; these lines should be spaced 2 centimeters apart. Next, take your tweezers and carefully extract the shorter blue vertical threads that run between those two cuts. Magically, you will be pulling them away to reveal clean white horizontal weft threads, like the levels of a perfect ladder.
II. STRETCH DENIM TRAP: DISTRESSING SPANDEX BLENDS
Within our manufacturing plant, we have a professional 15+ people R&D unit that incessantly characterizes the fabric behaviours. As per our experience, fabric composition is of utmost importance while customizing:
- 100% Stiff Cotton: FRAYS EASY, 100% Stable Structure; White and Beautiful Weft Threads.
- The Spandex Blend (stretch): Elastic core, susceptible to failure, will cause the “Curling Rubber” effect.
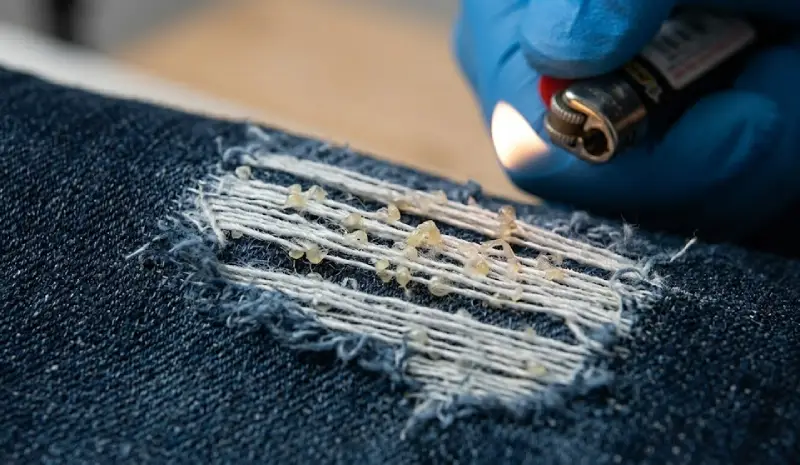
100pct rigid cotton is what amped-up, vintage-style distressing reacts to best. Fraying stretch denim (with 1% to 5% elastane, Spandex or Lycra) is done by cutting the highly tensioned elastic cores. When cut, these small rubber bands recoil and shrivel away to a wedge of matted yellowish elastic nubs that look like lint.
Pro Factory Workaround (The Micro-Flame Trick) The Lowdown: If you HAVE to distress stretch jeans,First peel back white threads — Suddenly you will see fuzzy, translucent elastic hairs sticking out awkwardly. Get your regular butane lighter, turn it as low flame and slightly run the tip of the flame 2-3 centimeters under the distressed spot. That heat will immediately melt, compress and permanently bond the synthetic elastane back into the core cotton threads to hold them in place.
III. Placement anatomy: working that denim rip to decrease augment.
If something is going to be distressed, like the leather here, it should be made to seem less bulky by mimicking a high-friction zone.
Whiskers and Honeycombs
- Whiskers: Horizontal fading lines extending outward from the crotch area across the upper thighs.
- Honey Combs(Hanks): Diamond-shaped creases that form behind the knees.
Get the jeans on and get seated. Use tailor’s chalk to mark where the fabric falls naturally. Remove the jeans, slide in your cardboard backer and lightly rub 80-grit sandpaper across those lines. Steer clear of making the widest part of your outside thighs distress — bright horizontal spots there will visually broaden your suppleness.
The “2-Centimeter Above Knee” Rule
The single biggest fail that DIYers fall down on is to centre a massive knee rip directly over the centre of the kneecap while standing too. When you sit down, your knee bends nearly at a right angle to hold fabric up by several inches. This causes a lot of pressure on the white weft threads and snaps them immediately.
To avoid this, when standing, mark the center of your knee cap and then draw your blueprint 2 centimeters above that. As you stand, the rip sits perched at a flattering height; as you sit, the opening hits directly over your kneecap without any excess material bunching up.
IV. Pre-cut (Blueprint Anchor): Locks threads for 50+ washes
Raw, distressed cotton fibers are unsupported against the aggressive washing machine cycle, which is why standard DIY ripped jeans often turn into giant crying black holes during a spin.
[Invisible Cross-Stitch Architecture]
Step-by-Step Invisible Cross-Stitch Network:
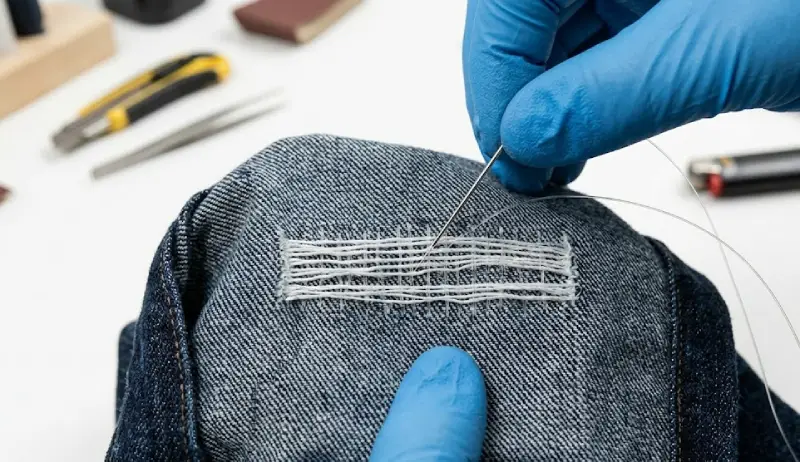
Step 1: Turn your ripped jeans inside out
Use a needle used for sewing by hand, wrapped with a strong, translucent nylon monofilament yarn (clear sewing thread).
Place your thread about 1 centimeter above your distressed window in the undamaged part of your denim.
With your needle, sew a line of mini vertical running stitches all the way down through those horizontal white threads that are now visible on the back, going over and under them.
Mark these stitch lines vertically every 1.5 centimeters wide on the surface of the rip.
The thread itself is 100% invisible from the outside, leaving those delicate lines totally clear, locking into a firm grid that can handle 50+ machine washes with ease.
No-Sew Option: If you don´t sew, cut out a piece of lightweight fusible iron-on interfacing that is 2 centimeters bigger than your distressed window. Trace the window shape and cut out the center of the interfacing. Attach it to the inside circumference of the distress area and apply a thin line of washable fabric glue down the raw-cut edges as a fray-preventing barrier.
V. Texture More Advanced: Fading and Weathering
Pumice Stones and Rubber Mallets
Avoid the risk of grinding all the way through fabric using a power tool; use an alternative with factory-proven results. Lay your jeans out flat on a hard cement surface with a board inside the leg to provide support. Clapping / Hitting — Once you’ve got the marks where you want, firmly hit the places you wish to distress (like knees or corner pockets) with a rubber mallet in order to try and break some of those stiff industrial starches within the raw denim. Your follow-up should be to then use a dry pumice stone and scrub the areas where you have been struck, in order to create textures that will feel soft yet raised from your skin.
Precision Bleaching
To create an uneven, sun-bleached look in the distressed areas, you will not be dropping your jeans in a bucket. Instead, you need to mix up a half-and-half combination of standard liquid home bleach or Clorox with water. Take a cotton swab (aka Q-tip) and put it into the solution, then pass it gently over your cuts following the boundaries. Once the dark indigo has transformed in seconds to a pale, soft vintage blue (often within 3–5 minutes), rinse the area under cold running water ASAP to halt that chemical reaction and rescue the inner fibers.
The First Post-Distress Wash
Place your fabric inside the washing machine and put it on a cold cycle delicate (hot water will make any leftover free strings twist erratically). Spoon 2 tablespoons of plain table salt directly into the barrel; salt is a natural mordant that will keep excess indigo dye from seeping out. To dry hang the jeans up to air or lay them flat. Fully air-dried, your fringed edges will blossom in the form of beautifully fluffed and stabilised softwork panels.
VI. Troubleshooting Common Mistakes
- Q: Help! I had cut into the white horizontal threads by accident. How do I fix it?
- Q: How to Repair Your Favorite Jeans with a Hole? Back sew back and forth with your sewing machine or hand needle in white cotton over the patch lines. This approach is called darning and literally replaces missing weft yarns with newly woven white lines that match the lost threads while providing a high-end patched appearance found in many streetwear shops.
- Q: I have a pair of jeans with distressing at the hem, and it is finding its way further up – how do I stop this from happening?
- 2A: Making use of an indigo-appropriate thread, run a snug horizontal straight stitch or lockstitch fully around your leg panel at the precise 0.5 to 1 centimeters from where you want your fraying to finish. The loveliness of these hidden horizontal stitch lines does double duty as they are a structural barricade; the loose fibers below will all puff out and become luxurious, but the threads above remain locked tight.
Recent Comments