
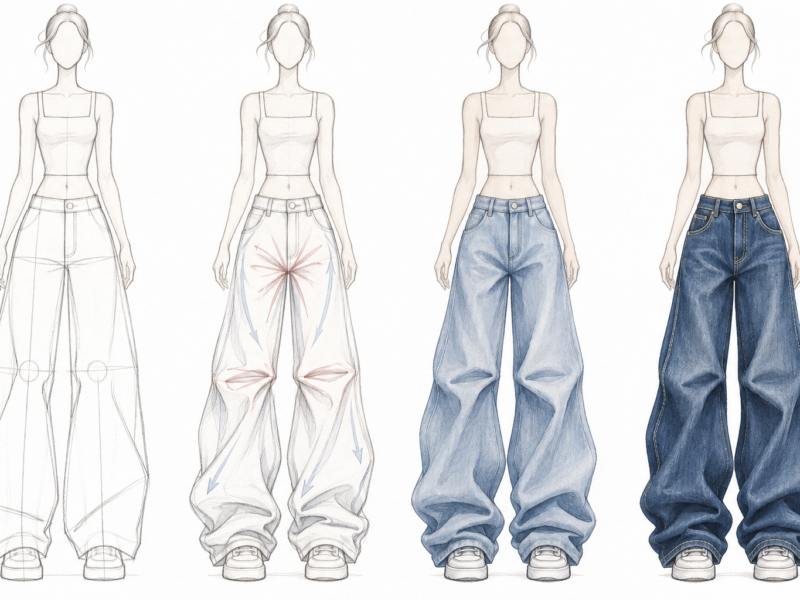
Welcome to the ultimate guide for modern fashion illustrators. Are you an artist seeking high-quality textures for your portfolio? Perhaps you are a budding fashion designer planning a new collection. Or maybe, you are simply a dedicated streetwear enthusiast. Regardless of your background, drawing realistic denim can be incredibly tough. Therefore, this comprehensive guide will help you master the art. We will cover absolutely everything you need to know today. Indeed, learning how to draw baggy jeans is genuinely essential in the current market. Currently, the famous Y2K fashion trend is back in full force globally. Consequently, mastering this specific drawing skill is highly valuable for commercial success. Let us dive right into the core principles of fashion sketching together. By the end, your custom drawings will definitely look incredibly professional. Furthermore, we will show you exactly how to manufacture them efficiently. Thus, you will go seamlessly from a simple concept to a finished product.
Why Beginners Fail at Drawing Baggy Pants Silhouettes
First, let us closely examine several common structural mistakes immediately. Many beginners struggle significantly with accurately drawing baggy pants silhouettes. Often, they accidentally draw them looking like giant, inflated balloons. Alternatively, they sadly look like regular wide-leg pants without any unique character. Unfortunately, this fundamental error ruins the entire streetwear design immediately. Why exactly does this frustrating visual failure happen? Usually, amateur artists completely ignore the crucial underlying human body structure. Furthermore, they totally forget about the actual fabric weight and physics. Gravity always plays a highly crucial role in fashion illustration here. A baggy silhouette is definitely not just a wide outline on a page. Instead, it is a highly complex interplay of draped, heavy fabric.
Therefore, you must intimately understand where the fabric rests naturally. For example, it always hangs very heavily from the human hips. Then, it aggressively pools and densely stacks around the lower ankles. Without correctly applying this structural logic, your sketch will absolutely fail. Consequently, studying real streetwear photographic references is strictly mandatory for everyone. In addition, recognizing dynamic fabric tension is always the ultimate key. Ultimately, a truly good silhouette actively requires both rigid structure and flowing freedom. Thus, practice observing real people walking in baggy denim daily.
How to Draw Baggy Jeans: Step-by-Step Fashion Sketching
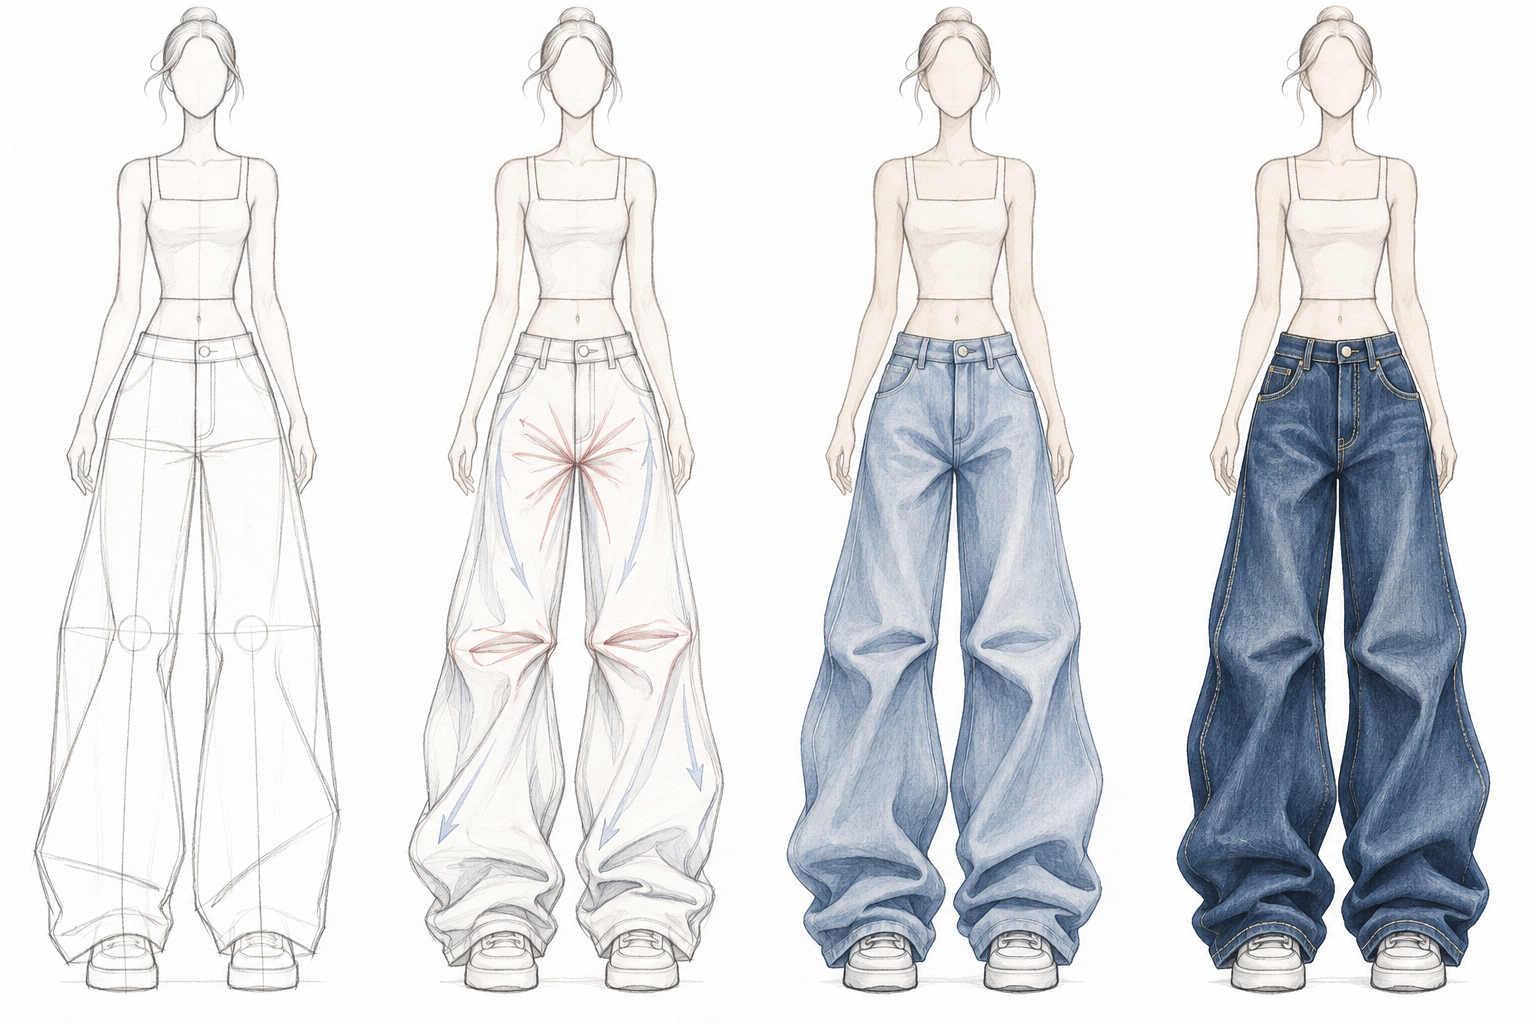
Now, let us properly begin the actual drawing process immediately. This step-by-step fashion sketching guide is specifically designed to be easy to follow. We will deliberately break it down into four highly distinct phases. First, we carefully establish the necessary oversized base properly. Second, we strategically add highly realistic tension points throughout the garment. Next, we heavily focus on the complex bottom ankles. Finally, we thoroughly refine the intricate manufacturing details carefully. Therefore, grab your favorite pencil and open your trusted sketchbook. Let us start creating your next stunning masterpiece right now.
Step 1: Blocking the Y2K Oversized Proportions
To begin with, you must accurately block out the basic foundation. Start with a basic, correctly proportioned croquis or standard figure drawing. Next, clearly determine the exact placement of the garment’s waistline. Authentic Y2K oversized proportions usually feature a very trendy low-waist fit. Therefore, cautiously mark the heavy waistband slightly below the natural waist. From there, aggressively draw the long outer seams straight down the legs. Drop them straight down toward the floor incredibly smoothly. Do not ever taper them too much at the bottom. Furthermore, the central crotch line should be significantly and clearly dropped. This is undeniably a classic signature look of all modern baggy streetwear.
A deeply dropped crotch actively adds an authentic, deeply relaxed feel. Consequently, your basic skeletal proportions will immediately look highly accurate. Keep your initial pencil lines very light and quite loose. After all, you will continually modify them later on. Thus, a remarkably solid, well-planned foundation always ensures a truly great final sketch.
Step 2: Locating Tension Points for Clothing Folds
Second, you absolutely need to add highly realistic clothing folds. However, do not ever draw fabric fold lines randomly across the legs. Instead, focus entirely on logically locating specific physical tension points. What exactly are these highly crucial tension points? They are specific, isolated areas where the denim fabric aggressively pulls. For authentic baggy jeans, the main tension points are the crotch and bent knees. Whenever a fashion figure walks, the rigid fabric stretches here very tightly. Therefore, dynamically draw sharp radiating fold lines directly from the central crotch.
Similarly, strategically add sharp, distinct diamond-shaped folds right behind the knees. Furthermore, relentless gravity continually pulls the heavy denim downward without stopping. Consequently, long, heavy vertical folds will naturally form along the upper thighs. In fact, fully understanding these vital tension points changes absolutely everything. Your previously flat sketch will immediately look beautifully three-dimensional and realistic. Thus, always purposefully map out these critical structural points first.
Step 3: Mastering the “Stacking” Effect at the Ankles
Next, we absolutely must tackle the bulky, complex bottom hems. This specific area is exceptionally crucial for credible, authentic streetwear illustrations. You must totally master the famous “stacking” effect completely and correctly. Basically, incredibly wide baggy jeans rarely fall perfectly straight to the ground. Instead, they heavily and stylishly rest on top of chunky, oversized sneakers. As a result, the excess denim fabric aggressively scrunches up tightly. To correctly draw this effectively, carefully create overlapping, irregular, harsh zigzag shapes.
Start this specific drawing process just right above the shoe collar. Then, organically build the heavy fabric folds slowly upwards toward the shin. Moreover, deliberately make the individual drawn folds look incredibly heavy. Heavy cotton denim naturally creates extremely thick, beautifully rounded stacking layers. Conversely, strictly avoid ever making them look like thin, sharp, unnatural accordions. In addition, let the rear back hem subtly drag on the floor slightly. This tiny, extremely subtle detail practically adds incredible, unmatched visual realism. Consequently, your successfully finished drawing will confidently scream authentic, premium streetwear.
Step 4: Adding Authentic Factory Seams and Pockets
Finally, it is truly time for the intricate micro details. Adding authentic, correct factory seams effortlessly brings a flat sketch to life. First, precisely add the classic signature J-stitch at the front zipper fly placket. Next, carefully draw the beautifully curved front pockets on the upper hips. Definitely do not ever forget the tiny, traditional coin pocket inside. Furthermore, if you are currently designing tactical cargo pants, add bulky side pockets. Accurate, logical placement of these heavy cargo pockets is undeniably vital. Usually, they visually sit perfectly right above the side knee area.
Additionally, heavily draw thick, highly visible double-needle topstitching along the outer seams. This visually represents the incredibly rugged, highly durable construction of real denim. Finally, strategically place shiny, metallic metal rivets directly at the pocket corners. These small, brilliant industrial hardware details massively elevate the overall design aesthetic. Therefore, never lazily skip this highly important, transformational finishing step. Indeed, these fine details easily separate struggling amateurs from highly successful professionals.
Expert Data: How Denim Weight (oz) Changes Fabric Folds
Now, let us seriously discuss a highly technical, advanced, and crucial aspect. The actual physical denim weight heavily influences your final drawing output. Specifically, the exact weight in ounces (oz) drastically changes how fabric folds. For a professional fashion designer, intimately knowing this specific fact is absolutely essential. Therefore, we will closely look at some incredibly vital expert data now. Generally, high-end modern streetwear brands constantly use premium medium to heavy denim. This robust, popular fabric weight typically ranges strictly from 12oz to 16oz.
Consequently, the very heavy fabric behaves fundamentally differently than standard, cheap cotton. Heavyweight denim is notoriously thick and remarkably, undeniably stiff. Therefore, it naturally creates very sharp, highly rigid, structural folds instantly. In stark contrast, cheap lightweight denim is extremely soft and notably flimsy. As a result, it unfortunately creates weak, fluid, highly draping folds. Understanding this complex underlying physics instantly makes your fashion sketches highly accurate. Thus, you must always decisively choose your precise fabric weight before drawing.
Sketching 14oz Heavyweight vs. 9oz Lightweight Denim
Let us thoroughly compare two very specific, popular denim weights directly. First, carefully consider standard, highly rigid 14oz heavyweight denim material. This is a classic, highly durable, premium raw material choice. When accurately drawing 14oz denim, purposefully use sharp, aggressive, angular pencil lines. The resulting fabric folds will very often look heavily diamond-shaped. Furthermore, the thick fabric stacking at the ankles will be incredibly chunky. It will visibly resist gravity slightly due to its extreme, rugged stiffness.
Next, actively consider cheap, flimsy 9oz lightweight summer denim material. This particular woven fabric is comparatively much, much softer and thinner. Therefore, your pencil lines should be highly flowing, incredibly smooth, and gently curved. The resulting fabric folds will drape downwards gracefully, softly, and easily. Moreover, the lower ankle stacking will sadly look quite flat and highly compressed. Consequently, you absolutely must fundamentally adjust your personal drawing style accordingly. By deliberately doing this, your viewers can actually visually “feel” the specific fabric. Indeed, successfully portraying this expert level of physical detail is truly masterful.
Shading Techniques for Realistic Denim Texture & Whiskering
After finally finishing your outlining, you must skillfully apply dynamic shading. Utilizing proper shading techniques miraculously creates highly realistic, believable denim texture. First, consistently use a tight, precise cross-hatching pencil method everywhere. This specifically mimics the highly unique diagonal twill weave of real denim. Next, you definitely must draw the extremely famous faded “whiskering” effect. Whiskering essentially refers to the bright, faded lines heavily stretching around the crotch.
To easily achieve this, gently use a kneaded eraser directly on heavily shaded areas. Alternatively, purposely leave totally blank white streaks during your initial shading process. Furthermore, carefully add highly distressed, light fading prominently at the outer seams. Always highlight the heavily raised edges of the bulky pockets and thick hems. Consequently, the illustrated jeans will effortlessly look authentically washed and perfectly worn-in. In addition, purposely use much darker shading very deep inside the hidden folds. This directly increases the visual contrast and overall depth immensely. Therefore, please take your sweet time thoroughly with this critical shading step. Ultimately, exceptionally good shading brilliantly brings the beautifully drawn garment to life.
Common Mistakes When Sketching Streetwear Fits
Even highly experienced, famous experts make foolish errors sometimes. Therefore, let us briefly review several extremely common mistakes made when sketching streetwear fits. First, overly eager artists very often draw way too many wrinkles and folds. Consequently, the baggy pants surprisingly look terribly ill-fitting or simply unironed. Please remember always, doing less is very often doing much, much more. Second, rendering the bottom hems far too rigidly is a massively huge mistake. Oversized, trendy baggy jeans absolutely should always look remarkably relaxed and casually cool.
Therefore, actively avoid drawing perfectly straight, unnaturally stiff lines exactly at the bottom. Furthermore, completely ignoring the invisible underlying human leg shape is deeply problematic. Even heavily hidden beneath massive baggy pants, the bent knee and thick calf dictate movement. In addition, totally forgetting to draw the topstitching makes the complex sketch look like cheap sweatpants. Thus, you must always faithfully include highly standard denim-specific construction details. By carefully avoiding these highly obvious pitfalls, your professional fashion sketches will undoubtedly shine brightly.
FAQ: Drawing and Manufacturing Baggy Jeans
Q1: How do I stop my baggy jeans sketches from looking like inflated balloons?
First, absolutely ensure you are accurately mapping the hidden skeletal structure. Next, carefully drop the central crotch properly and deeply. Most importantly, accurately locate your specific tension points directly at the hips and knees. Therefore, the heavy fabric will drape naturally downwards rather than awkwardly bowing out sideways.
Q2: What is the absolute best pencil for sketching rough denim texture?
Typically, a standard HB pencil is absolutely perfect for drawing initial light outlines. Furthermore, purposefully use a soft 2B or 4B pencil for deep, rich shading. Consequently, you can confidently achieve that highly desired high-contrast, beautifully realistic denim texture quite effortlessly.
Q3: Can I actually get my baggy jeans manufactured with a relatively low minimum order quantity?
Yes, absolutely and undoubtedly. Many premium, high-quality factories, notably such as Kaiping Lianwang Garment Co., LTD, offer absolutely excellent OEM and ODM services for developing brands. Furthermore, they intelligently provide fantastic one-to-one comprehensive services to expertly help you develop your new products successfully.
Q4: How long does it usually take to develop a brand new custom denim sample?
Generally, a truly professional factory will actively take about 10-20 days for proper sample development. Afterward, the full bulk production stage usually takes exactly 25 to 35 days. Thus, you can confidently launch your exciting streetwear collection very quickly.
Q5: What specific denim weight is truly best for authentic Y2K baggy jeans?
Usually, heavy 12oz to 14oz denim is absolutely ideal here. This specific heavyweight fabric perfectly creates the stiff, angular diamond-shaped folds and chunky lower ankle stacking that heavily define the authentic Y2K aesthetic. Conversely, lighter weights will unfortunately look entirely too flowy and visually cheap.
Designing a collection from your sketch? Explore our guides to starting a denim brand, turning a custom jeans design into production, and how jeans are made in a denim factory.
